Showing posts with label Accuquilt Go. Show all posts

Tuesday, September 24, 2019

"WHISPERING FEATHERS"

This quilt pattern made it into the Island Batik Fall/Winter Catalog 2019

                                                              Free Space

The fabric line is "Whispering Feathers"

I just love these fabrics but I have yet to not like any of Island Batik Fabrics.


I used Hobbs batting (I just purchased a whole roll of Hobbs Batting)...love it!


I used Aurifil Threads  #2315 (light tan) and #2568 (burgundy for blanket stitching)


Notice all of the circles?  At one time I could have told you how many I used but I am too lazy to calculate or go and look it up (that is right lazy).  As you can see there are a lot.

I used the Accuquilt Go Cutter Circle Die #55012.  Sure made fast work of the circles.

I opted not to use any fabric adhesive.  For one, it would take a lot, and then you would need to cut and iron....so this gal is LAZY!!  Also, it would make the quilt stiff in places.

I used elmer's glue and a lot of starch, only putting the circles on when I wanted to sew them on.  Normally if you use fabric adhesive you will iron all of the pieces on and then applique.  I just did one at a time.....I glued the circles, ironed them and then glued them on, as I said one at a time.  Worked out great.

This was a lot of fun but for me stressful because I wanted it to turn out perfect.  Each year I say I am not going to do another pattern for the catalog because I get so stressed but this is my fourth pattern in one of Island Batik Catalogs.  Will I say never....NOPE

Friday, September 6, 2019

CHILD'S PLAY - BEAR'S PAW

The Island Batik Challenge for this month is Child's play using the BOB (block on a board) Accuquilt Go die.  It does not get any easier than this or any more fun!


Here are a few things you can do with this die.

Beaquilter received the same die, if you are interested in seeing what she has done for this months challenge, go here.


Aurifil Threads #2605 (grey) for sewing and #2130 (light yellow) for quilting.


I had originally planned a different border but didn't like how it looked so I opted for this border.  They are sewn together like you would sew your binding pieces together (on the diagonal).


The brighter the fabric the better.  That is my Motto!

51" x 61"

I used Island Batik Foundation Bundle Coordinates - basics and blenders from the recent box they sent to us.  Island Batik White (can't go wrong with white).


The whole time I was making this quilt I kept thinking of crayons. I always loved the beginning of the school year when we had a brand new box of crayons.  I also love smelling them....just like glue, and fabric....ha ha....  yep...I am a crayon,glue, fabric sniffer and proud of it!


Monday, March 4, 2019

Vintage Reimagined - Island Batik Ambassador Challenge for March


First of all, can you believe it is March already?


Island Batik Challenge for the month of March is "Vintage Reimagined."


50" square

As you can see, I used a lot of my Island Batik Scraps.  Some of the 5" strip stash builders I just received in my box.  Perfect for the 8" Go! Qube


I used the Drunkard's path Accuquilt Go die
GO! Drunkard's Path-7" Finished


Making tons of Half square triangles


Some Delightful Hobbs Batting


My favorite color of Aurifil Thread.


Which makes up one vintage reimagined quilt!


When I thought up this design in my head, I just started cutting.  I cut three drunkards path...I showed my husband and one friend that I will not mention HIS name.  Ha Ha!!  Neither one liked this.

I almost threw it in the garbage but then thought, why not continue and just finish it.  When it started coming together I was excited because I really liked what was happening.  I had wanted to make this a two color quilt but when I got this one done I went on to something else.  Sounds about right!

I really enjoyed this challenge, some challenges scare me but when I sit down and think it through, my mind starts churning and then the excitement begins.


Thursday, January 18, 2018

HEART ATTACK DAY # 4 - ARE YOU STILL WITH ME? TWO TUTORIALS - CANDLE MAT AND HOW TO MAKE A CIRCLE


There are a few die hards that are hanging in there for my Heart Attack Week and for that I want to thank you.

                                                                 You bored yet?

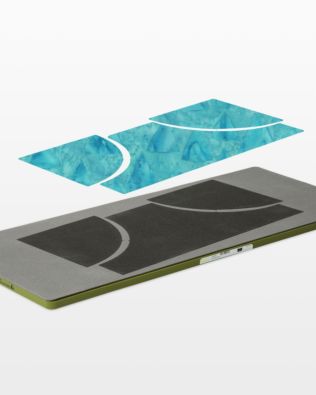
             Here we have a cut little Candle Mat or Topper.


Using my Accuquilt Go cutter, gorgeous Island Batik Fabrics, and aurifil thread for the blanket stitching.


I had to improvise on the fabric, I didn't have any fabric big enough for the back ground fabric so I just sewed three pieces together.  


Are you Ready?


You will need for this project a 12 1/2" square of fabric.  I would suggest that you do it with paper first just to get your footing.

As you can see above I use Freezer paper.  They were having a sale on it after deer season one year and needless to say I have more than one box.


There is nothing methodical about me, I just ripped off a piece that I thought would be big enough.

Fold in half.


Half again, so you have it in fourths.


Take and flip the top corner over to the side corner.


You get this with a nice point.


Then you place it over your heart shape on the Heart Go die.  I don't know if you can see but I have the outline of the heart on the side.  You do not want to go over the sides of the die or you will just get eight cut out hearts.


Here is a better picture....You can see the actual cut out.


Now for the center of the heart.  On the go die there are three hearts.  You want the small heart but next to it is the medium heart.  See how I outlined that medium heart.  You do not...and I repeat, you do not want your mat to cross over to that medium heart.

OR


You get this.......


Or THIS     

Do you hear me sobbing....I thought I had the die mat away from the medium die.


I love this one.....................I was thinking of maybe putting fray check on it and making it anyway.

Or if there anyone out there that would like this?  If you want it speak up and I will send it to you.


So here it is all spread out.


Now all you need to do is make the circle for it to go on.

The actual cut out is about 12 1/2"  but the background is 14"

HOW TO MAKE THE CIRCLE

The circle that I am going to show is is going to be 8 inches in diameter.

The math is pretty simple, has to be for me to get it right.  If you want a 14" circle you will just divide in half and get seven....so any circle size you want, just divide in half for your marking measurement.

Fold the paper (fabric) in fourths.

Since I want an 8 inch circle (you will want a 14" circle in diameter, this is just for my demo), I want to cut the eight in half, which is four.

So I want to measure four inches on the side as you see below.


Now the bottom of the ruler is going to stay in that corner, you will pivot across the top.


As you pivot, you will leave a dot.


Pivot and dot all the way across to the other side.


Once you have gone to the other side you will join your dots.  Or you can just cut from dot to dot.


Now you are going to cut the line but I have learned from experience that you need to leave a little dog ear at each side.  If you do not, sometimes the sides will make a V inward.  You can always take away fabric but you can't add to it.


Once you have it laid out you can just cut the dog ears off.

Now you have everything you need.

Heart cut out.
circle background fabric.
Batting 
backing.

Sorry I don't have any pictures for the rest.

You will lay your cut out on top of your circle.  

I love using fusible but the fusible would make it to thick for my go cutter.

Just glue the top and then go around and glue the bottom.

Quite simple.  You might get a pucker here or there but nothing earth shattering.


After it  is glued down, you can either blanket stitch around it now or do what I like to do and blanket stitch through all layers, top, backing, and batting.

Be sure to have the batting and backing just a little bigger than the top.

Quilt as desired.


Bind it and you are finished. 

 I am here to tell you that you can have this whipped up in no time.

Today my gift to you is the tutorial.

The mistake cut out, which I love (if anyone wants it, just say so).

Then I am going to give away this little mat as well to say thank you for coming by.

Just because you have won a pattern once doesn't mean you can't win again.

-----------------------------

The winner of yesterday's pattern is


Blogger Kansas Kay said...
I can see why this pattern is a favorite! The border is especially nice! I would like to win the pattern! Thanks for the giveaway.

Tuesday, December 5, 2017

TABLE SCRAPS

When I think of table scraps I think of the food that is left over that goes to the dog or chickens.  Better yet, if there is enough food left over for a meal I will freeze it and pull it out later when I don't want to cook and my husband is hungry.

As you can tell, we are not talking about table scraps in the literal form but in the form of using our Island Batik Scraps to make a table topper, runner, etc.

Personally, I love to dress up my tables. bureaus, dressers, end tables.  This is where my color comes in because I am basically a neutral person (I know, I make some pretty loud items). 
I tend to gravitate towards the louder side of life.

That being said....  Here is my Table Scrap


Made from my Island Batik Scraps.


                                                              I decided to make a dish mat

I know you are thinking  "Barb that is not a table topper".  You can use it as one but when I think of table scraps I think of doing the dishes.  Why not have something fun on your counter as you do so.

In fact, I had made a little dish mat for a friend and when I was visiting, she had a few forks and baby bottles on hers and I thought, wow, that actually looks nice.


I took a 17" x 15" piece of fabric for the backing, rounded the corners after all the fabric was sewn on.
Then added 2 layers of batting.


As you can see I started from the middle with one piece of fabric and did the quilt as you go method by putting another piece of fabric right side down on top of the middle fabric and sewed down one side. .

I just continued doing this all the way down one side of the mat and then from the middle out on the other side.


                                                                   Here it is finished

                                                     
                                                                    with the binding on.


                                         Added a little Aloha with my Accuquilt Go flower die.

                                             Now if my little dish mat doesn't fit the bill.......


Here is a round topper, you can't see the metallic threads but this topper just glitters away.

This  topper is made with my Christmas Tree die and my Accuquilt Go cutter.

The Tree fabric is scraps from the "Alpine Jingle" line .  I have been working on my Island Batik project for January and just borrowed some scraps from it.


Here is a little candle mat, I call kissing reindeer using my Accuquilt Go cutter and reindeer die.

Both the Tree and the reindeer took a 13" square of gorgeous Island Batik fabric and yes, I did raid my scrap bin for the reindeer.

It is amazing what one can do with a few scraps.

I personally can't wait to see what the other Island Batik Ambassadors make and will try to post some of their things as time permits.