Showing posts with label lapel sticks. Show all posts

Sunday, October 18, 2015

BUT BABY IT IS GETTING COLD OUTSIDE - Free Patterns and Pumpkin Tutorial

My post has nothing to do with what I am showing you except for the fact my husband turned the heater on for the first time this morning.  

I noticed when I got up that it was cold, had to run to the bathroom and then back under the covers.  I don't mind the cold like I use to.

I also noticed all of the Halloween decorations as I was reading blogs this morning so decided to show you some of mine!

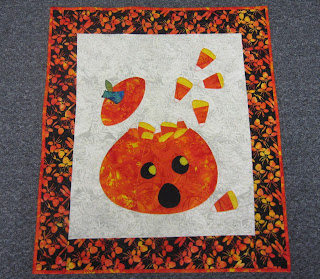
I just love this candle mat.


If you have a go cutter or not these are really easy to make.  You fold your paper in half and then in fourths and then place the paper with the folded side up (no raw edges) side towards the stem making sure that you have some of the pumpkin showing like this.  

Or if you don't have an Accuquilt Go Fall Medley die you can just draw a pumpkin on your folded paper remembering to leave part of your side pumpkin off.


                                                                 Here it is cut.


                                                        Here is what it will look like


You can use a fusible before you cut always following the directions or you can glue this on afterwards.  The Lapel stick are fabulous for this.  Sometimes when you glue you might get a little pucker but most times you can smooth it out with your finger.

Then you place it on a 9 1/2" to 10" square, you can blanket stitch or straight stitch around the pumpkins (you can do this before you sandwich your candle mat or after).  I always choose to do this after, it just makes it so much faster to blanket stitch it through all of the layers and then you are finished no added quilting needed.

Bind and quilt as desired.

EASY!!

FUN!!

So here is a fun Topper I made last year.  You can find the pattern here:


Nothing makes me want to bake more than cold weather so here is a free pattern and you can find it here


Here is another free pattern:


Hope you enjoyed the patterns and tutorial...have an amazing day!

Monday, October 20, 2014

THIS POST IS ABOUT TEACHING OLD DOGS NEW TRICKS!!


This first picture is my ironing board cover (I know, I should do the walk of shame)...my head is hanging down as it is.  This cover is only a little over a year old.  Okay...shame on me.


 I purchased this applique pressing sheet at the same time I did the cover hoping to protect it.
I tried it a few times and just put it away thinking it didn't work.  hummmmmmmmmmm  this is where the old dog comes in.


fast forward to a year or so later, I pull out this pressing sheet thinking to just throw it away but thought I would give it one more time.

Did you know that you should let the applique piece cool before taking it off the sheet???  Like I have said before, My mother used to tell me I run off half caulked all of the time.  This is one of those times.

Guess what???  I love love the pressing sheet...my ironing board cover would have appreciated this revelation a good while ago...hummmm

Any one have a dog bone for me?  I can fetch real good too.


Here are the winners of my lapel stick giveaway

Karen Martin

LeAnn Law

Marilyn Pond

Terry Giet

and

Gill Watson

Thanks so much to everyone who came by and commented.  If I have not responded via email, I am so sorry, a lot of the comments are not hitting my email box and well...life just happens.

Wednesday, October 15, 2014

FROM DRAB TO GO-FAB!!!


 I have a baby shower this Sat.

Drab brown bag

Trusty Go Cutter

Animal die

Lapel Stick and here you are...from Drab to Fab!!  Even covered the card with orange fabric...


Here is a burp cloth


Wanted to cover the back

One 6" strip of orange fabric the length of the diaper

rotary cutter

Lapel Stick

Iron (glued the edges under, then glued the strip to the diaper....sew)  No gumming of needle, no waiting to dry, no slipping of strip!!

From drab to FAB!!!

Phone call last night saying they needed a pink baby quilt by Sat.

No problem, got these amazing pink squares that I went OCD on when doing a quilt a few months ago.

16 squares sewn together....and you have FAB!!!!  (still have about 40 squares left)


YEA!!!  ME!!!

Tuesday, October 14, 2014

OUT WITH THE OLD, IN WITH THE NEW!!!!

OUT with the OLD


IN with the NEW


 When you are in a pinch, out of fusible.....grab your Lapel stick and swipe away.

 Or if you want to save your fusible.....!!!  Just saying...


 Worked perfectly!!


I guess I am in a festive mood today...just cool enough to strike those Christmas juices.
                                                         
                                                   If you want to enter the giveaway, enter here

My Lapel Sticks came in yesterday and if you order BEFORE October 20th this is what you will get plus four more.


Impressive!!!  Go here for the promotion of 40 sticks for 50 dollars, no shipping cost for the US.

Some of you said, I would love some but I don't want forty.

 Maybe you can split it withe a few friends?

Maybe you can give some away as Christmas gifts?

  Wouldn't a quilter, seamstress,  fashionista, or crafter love some of these sticks????  I know I would!


Besides making Christmas towels I am working on a scrap quilt I started a while back.  Hopefully, I will have something to show to you soon.


Saturday, October 11, 2014

MY APOLOGIES - LAPEL STICKS

I know I said that I would have another post on how I use the Lapel Sticks but....as most of us know

LIFE HAPPENS

Sometimes it happens in the most odd ways.


Nothing bad

I just had a birthday....and I thought that nothing major was going to happen that day...

but

I had visitors, several (like five) phone calls, running around with my husband and low...
the night falls and it is bedtime and as I am laying my head down I think

Where did the time go?

So...the next day I think I will get to it but I had two cousins come over to sew and we celebrated my B day as well...PARTAAAA

Oh my gosh...another day gone and no post.

Today comes.....and still I am partying....can you believe it?

I can't!!!!

So...the giveaway post is below and the link to where you can buy your 40 sticks is on my side bar

my apologies.....


Tuesday, October 7, 2014

INQUIRING MINDS WANT TO KNOW WHAT A LAPEL STICK HAS TO DO WITH BINDING A QUILT! (giveaway)

I have had a few people ask me what I use my Lapel Sticks on.  So I am going to show you.

Come with me while I bind my quilt.

Here I am getting my binding ready....no lapel stick needed yet.


Now...don't look at my ironing board cover, I actually think it is time for a new one.


 Folding my strips in half with steam


No Lapel Stick needed yet...but I promise, I will be getting to it soon.

Sewing the binding on one side.

 Here is my trusty binding tool that I got at Missouri Star Quilt Co., they even have a tutorial on how to use this tool...but we are talking about Lapel sticks today...so let's get to it.

 After I sew most of the binding on one side I need to join the two ends together....

How you ask?

Get my amazing Lapel Stick.


See where I have put the Lapel Stick on the edge of this fabric.  It is great.


Here it is glued together.  All it took was a line of glue, finger press the two pieces together and there you have it.  No pins to mess with.  Trust me, using pins is a pain when you are trying to do this.

 Sew it together...and WAAAAALAAA    Then to finish sewing it to the quilt.  But we are not done with the Lapel Stick yet so keep it out.

 Remember to turn off your steam on your iron (steam is not good on the fingers).

See how I put the Lapel stick on the binding part....So I apply the stick, iron, apply the stick, iron.  This is such a great way to get your binding on so nicely.

I flipped the binding towards the backside. (I think my mother does it opposite of what I do..but hey...she loves it her way and I love it mine).

 Then I flip the quilt over and sew in the ditch, it catches the binding on the other side right nicely...no pins or clips needed.


Now for the fun part.  

I know that some of you have asked..."Where do I get these Lapel Sticks?"

Keith who created the Lapel Stick is offering

40 Sticks for 50 dollars, shipping is included in this!!

That is such a deal.

Display Box


This offer is good until October 20th!!!

Tomorrow I will show you some other ways I use these Lapel Sticks.

I would love to give one away to a few readers, just comment below and we will see what we can do...(I am talking like there is a mouse in my pocket...hummmm)

Wednesday, September 24, 2014

STICKY SUBJECT

First off, I wanted to show you the finished quilt!  YEA ME!!!   I had originally done a middle but didn't like the shoes, looked to babyish as you see in this picture.  

For some reason I just couldn't continue on with this quilt because it is not a baby quilt.  So it sat for a few weeks while I thought....and thought...


Finally I took it out and came up with these shoes and I must say I am so much happier.  Quilt has been folded up, forgot to take a picture when it was finished, therefore wrinkles.

 We will get to these Lapel sticks in a minute.


 Finished this baby quilt using the panels and last border from Inchworm Fabrics.  I am not really a fan of panels and w  I cut them apart, added the sashing and the rest is history.  My sister Beverly gave me the ABC's and I found the ABC border in my stash...whohoooo  that was a true happy dance (did you feel the earth quake)?  Now I feel differently about panels...I went in search of more in my stash...


I had not heard of these sticks before until Gene posted on his blog about them, once again....just hit his name and you will be transported to his take on the sticks.  I was so interested in his post that I contacted Gene about these sticks.  Then he hooked me up with Keith, president, of the company who makes them and he sent me some to try.

Here is my take on the sticks.  I use the glue stick to bind my quilts, I sew the one side, glue the other and then sew...makes is to easy

Here is what I found:
1.  Don't use steam with the Lapel Stick.  I use steam with my glue sticks, found it works best that way.  So the Lapel Stick goes easy on the fingers....no steamed needed.

2.  As far as mess, the lapel stick wins hands down....usually when I use glue sticks I have a mess all over the fingers I am using.  With the Lapel Stick I have less mess and it takes me less time to wash up or if I have to wash up at all.  I know, there are some of you out there that are not messy...pooey on you (smiling)....I can't do anything without making a mess so this is an issue with me.

3.  I really wanted to try this product because I go through a lot of glue and am always up for a different type or something that will make my life a little easier which I have found that these Lapel sticks are a pretty smart idea.  

Thanks Keith for allowing me to try this product and Gene for introducing them to me.